How to Make a Musical Giraffe Digital Illustration
Oct 17th in Photo Effects by Tom Miatke
In
this tutorial, we will convert an ordinary picture of a giraffe into a
wallpaper of a giraffe fading away into musical notes. This design was
used in my entry to the AudioJungle Wallpaper Competition
and managed to place in the top twenty, which made me think that some
people on PSDTUTS might want to know how I made. So letÂ’s get into it!

My
name is Tom Miatke and I am a Graphic Designer from Horsham, Australia.
I love to make pictures in Photoshop and Illustrator and hope to make a
career of it. If you like my work, then please have a look at my other
works as well on Flickr, link below.
Final Image Preview
Before we get started, let's take a look at the image we'll be
creating. Want access to full PSD files and downloadable copies of
every tutorial, including this one? Join PSDTUTS PLUS for just $9/month. You can view the final image preview below or view a larger version here.
Step 1
First off we need to get some things for this tutorial, a picture of
a Giraffe which can be found through sxc.hu, here is the link to the Giraffe. We also need some music note brushes, which I was able to find through a site called Obsidian Dawn.
Now that we have these assets, we should get started in Photoshop.
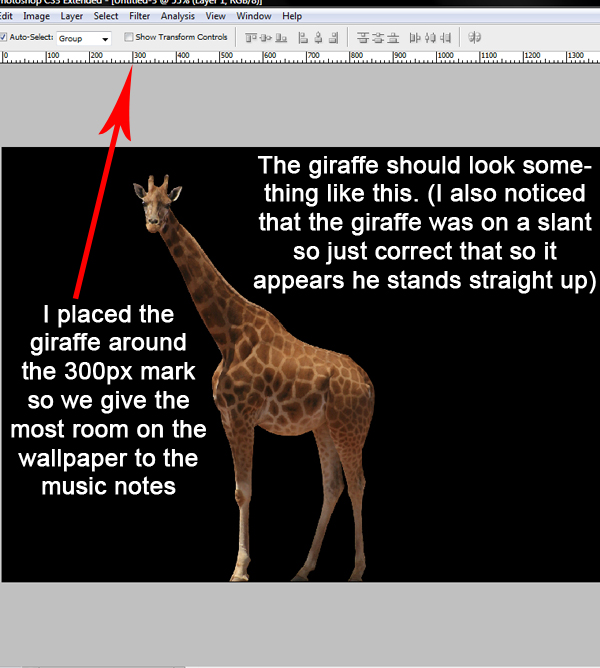
Create a new document 2000 pixels wide by 1000 pixels high. Set the
background color to black.
Step 2
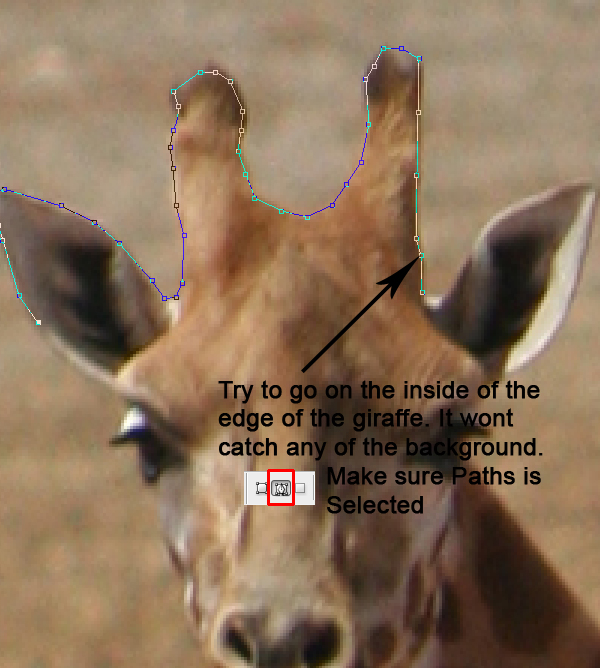
Open up the picture of the giraffe in Photoshop and grab the Pen
Tool (P). Make sure that Paths is selected, as we are going to cut out
the giraffe using the Pen Tool, so we can get the best edge available.
Zoom in pretty close to the image so you can get all the fine elements
of the giraffe (I zoomed into about 300x to get a good edge).
Now its just a process of going around the giraffe ignoring shadows
and the tail. Just keep going right the way around until you end up
back at the start.
Step 3
Once you have completed the path, right-click and a dropdown box
should appear. Click on ‘Make Selection’, then a dialogue box will
appear, set Feather Radius to 0 and press OK. The selection will appear
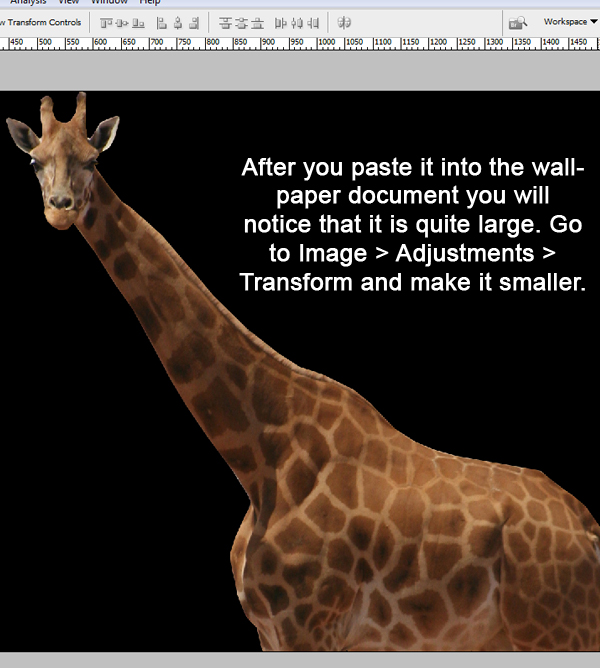
as a running line around the Giraffe. Now go to Edit > Cut (Command
+ X) and paste (Command + V) in your document.
If you do not have the Ruler on your page you can easily turn them
on by pressing Command + R. After you have adjusted its stance, and
size, re-name this layer to ‘"Giraffe’."
Step 4
Now just by looking at this giraffe, the color seems to be a bit
flat. so lets make him pop a bit. For this to happen we are going to
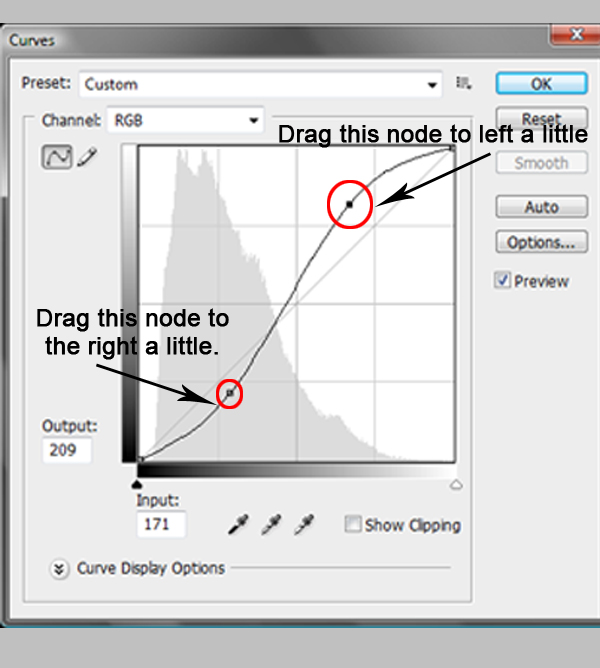
use Curves. Go to Image > Adjustments > Curves. You will notice a
diagonal line running from the bottom left corner to the top right
corner, this represents the current color.
When you click on the line you will see a little ‘node’ appear on
the line, this is what you use to change the colors. If you drag this
node to the right you will see your picture gets darker, but if you drag it left
it will get lighter. This curve line is a very good way to adjust the
contrast of photos and is an important tool that photographers use to
get fantastic black and whiteÂ’s and a more vibrant color.
Although this is a great tool, it is also pretty heavy in the sense
that it will affect the image a lot with only small adjustments, so
take care with your images. The diagram below shows what adjustments I
have made, but you can vary yours if you want a different effect. Once
you have finalized your effects press OK. Now we will just Sharpen it a
little, so go to Filter > Sharpen > Sharpen to help define the
edge.
Step 5
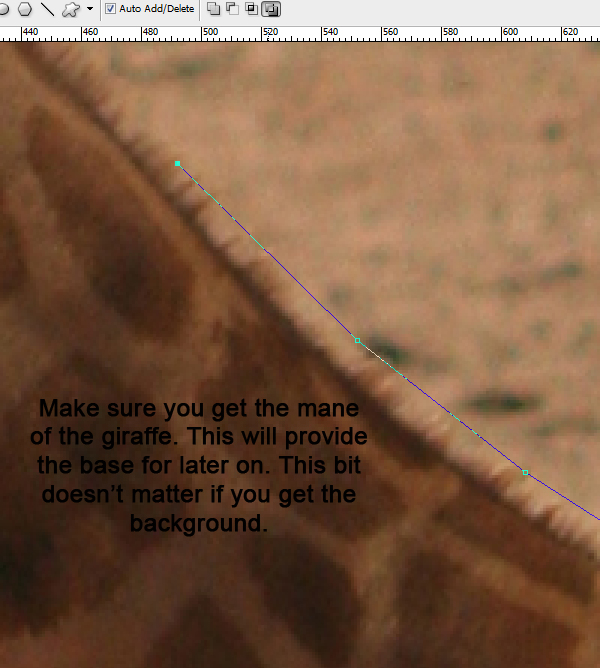
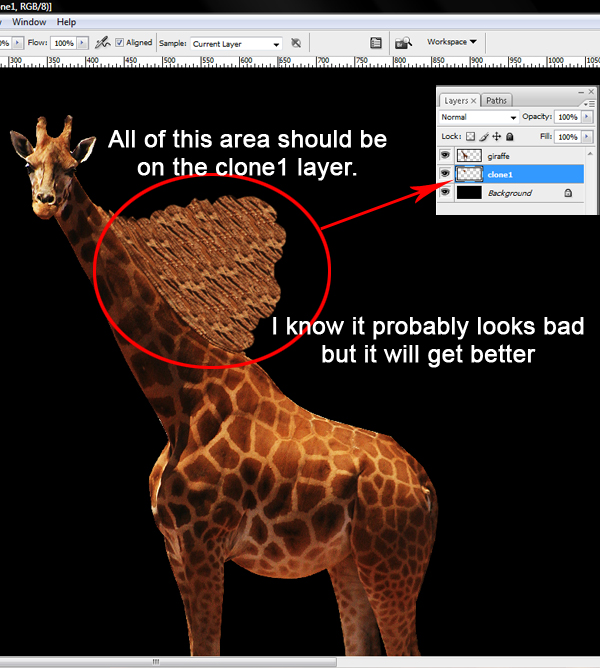
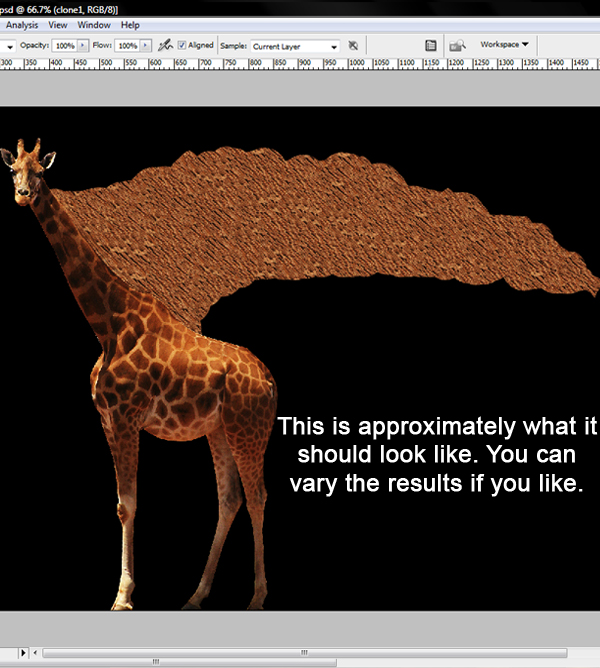
Now its time to start the fading away area. We will do this
is mainly using the Clone Tool (S). Create a new layer above the
"Background" layer and re-name it to "Clone1." Select the Clone Tool
(make sure your back on the "Giraffe" layer before defining your Clone
Point), and hold Alt down while clicking on the mane of the Giraffe.
Now go back to your "Clone1" Layer and click down and start cloning,
start with a small brush and then gradually get bigger. ItÂ’s best to
zoom in quite a bit as well. Just keep going until you get a large area
of cloning that will be turned into musical notes, as shown in the
second image below.
Step 6
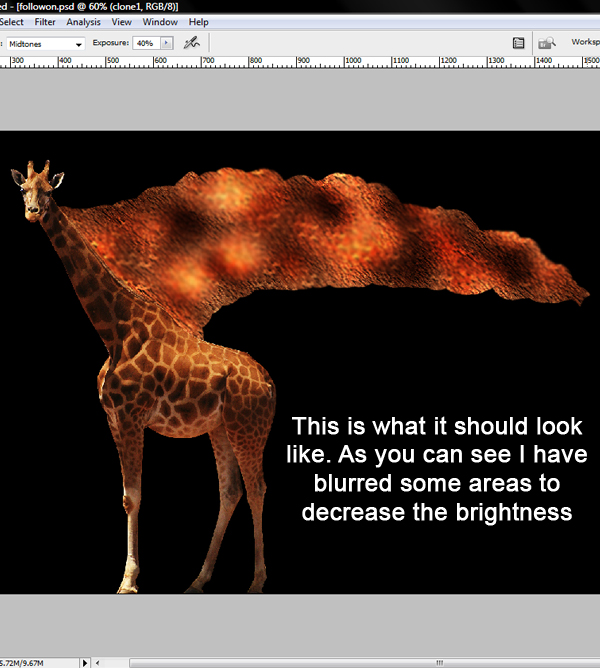
Just to add an effect we are going to add contrast to different
areas of the clone layer. Grab the Dodge Tool (O), and apply these
changes: start randomly going over areas of the "Clone1" layer, make
some small areas bright, and leave some areas as they are as well.
Step 7
Do the same with the Burn Tool (O), try to hit the areas you did not
brighten before. I also blurred some of the areas that went too high in
contrast with the Blur Tool (R).
Step 8
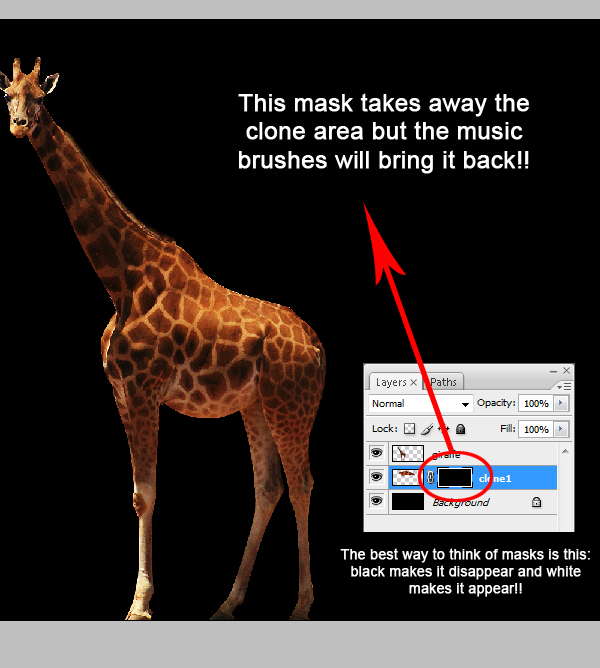
Now that we have finalized the effects of the cloned area we are
ready to move onto adding a layer mask. Layer masks are very handy to
use because they preserves the layer that your working on by covering
the layer in the Â’maskÂ’ and allows you to Â’hideÂ’ parts of it.
This way, if you make a mistake, you are able to delete, disable, or
just fill the mask with black and you are good to go again. So letÂ’s
try one now. Select the "Clone1" layer and click the Add Layer Mask
Button. You will notice a thumbnail appear next to the layer thumbnail
in the Layers Palette, that is the mask. Currently it is not doing
anything, but when you fill it with black using Command + Backspace or
the Paint Bucket Tool (G), everything on the layer will disappear.
Step 9
If you have not installed the music notes brushes, then here are some steps to help you install them (Skip this if you have already installed them):
- Click on the Brush Tool (B)
- Click on the dropdown arrow on the Options bar up top
- Now click on the arrow pointing right, which will then brings up another dropdown box, go to Replace Brushes
- Your music brushes should be there now
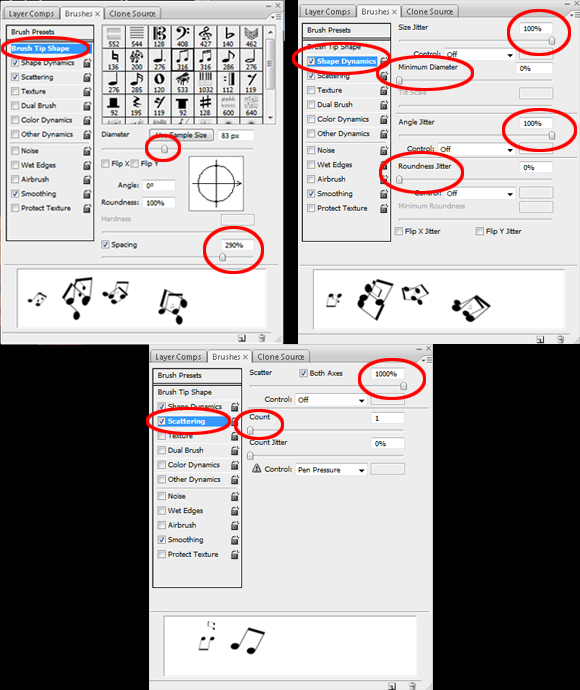
Click on the Brush tool (B) and select one of your musical note
brushes (not one of the piano or the big bars of music found in the
brushes). Consider using brush 316 for example. Open the
Brushes Palette, and apply the setting shown below. Now on the masked
layer set the foreground color to white, then you should be set for
painting...
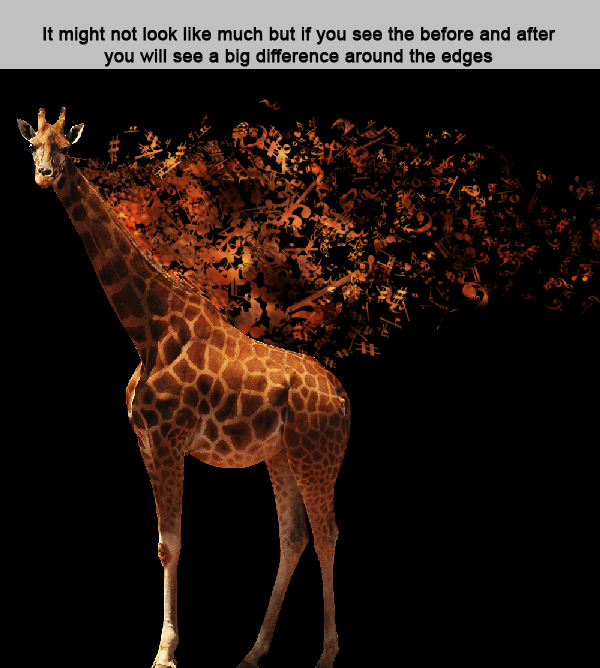
Step 10
Now with the painting, you have to be careful because you want the
clone layer to look as if there are a lot of notes big and small fading
into small notes of only a few. Remember to vary the brushes, donÂ’t
just stick with the one note, swap them around and adjust some of the
settings to get a different effect.
Gradually decrease the size of the notes as you get further away
from the giraffe. Have a go at it. Also, if you want to do more to the
original "clone1" layer, then you can. To do so, right-click on the
mask thumbnail and click Disable Layer Mask, then make your changes. It
wonÂ’t affect the mask. Remember, if you make a mistake, you can fill
the mask layer with black and you can then restart.
Step 11
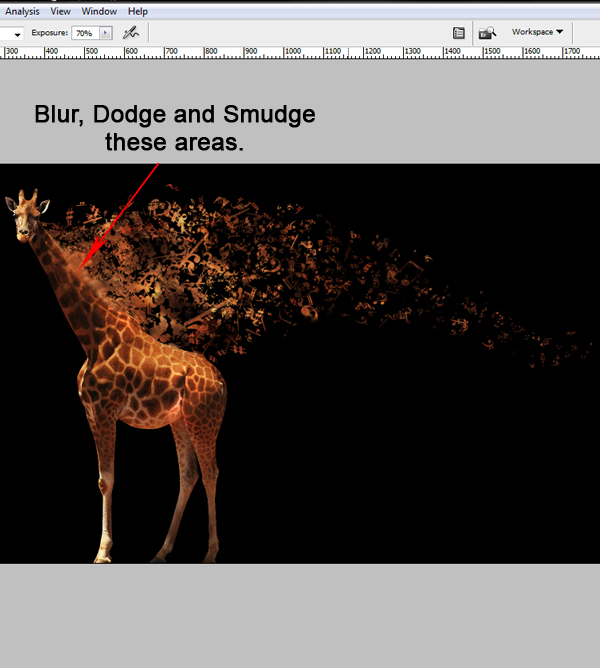
Now this image looks pretty good, but there are still some
adjustments that we can make. The edges of the clone layer could use
some work. I noticed that they are sharp edges so we are going to
create a new layer with some more notes on this to help get rid of
those sharp edges.
Create a new layer above the "Clone1" layer and re-name it "Clone2."
Grab the Clone Tool again (S), then click the "Clone1" layer and define
a clone point (Alt + Click on the area). Now, go back to the "Clone2"
layer, and start to paint.
Quick hint, it might be wise to apply a bit of scatter to it using
the Brushes Palette with the same settings as we used before, except
reduce the scatter down to down around 320% and the spacing down to
about 180% or less.
Step 12
Now this looks much better, but there are still a couple of things
that I can see that need adjusting. The edge of the giraffe's neck into
the clone area is a bit too sharp, so letÂ’s try and fix that up. On
the "Clone1" layer go to Image > Adjustments > Hue/Saturation and
adjust the colors of the notes so they blend more to the giraffe's
colors.
There is just one more thing to do. On the "giraffe" layer grab the
Blur Tool (R), and just run along the edge of the mane part, just to
blend it in a bit. If you want you can grab the Smudge Tool (R), and
smudge the edge a little bit like I have. Finally, grab the Dodge Tool
and run along the mane area once on the "giraffe" layer just to
brighten it up a bit.
Conclusion
These effects can be applied to almost any picture to give fantastic
results and bring some zip to your photos and illustration work. You
can view the final image preview below or view a larger version here.
Subscribe to the PSDTUTS RSS Feed for the best Photoshop tuts and resources on the web.